Sunday, May 1, 2011

Fanciful Flower Potholders


Introduction: These Fanciful Flower Potholders are made of 100 percent dk weight cottons in bright and bold colors. Cotton is the preferred yarn for potholders because acrylic yarns can melt when handling hot pans or dishes.


What to Expect: Your first Fanciful Flower potholder may take a little longer but after that, you can probably crochet one in under two hours. The finished potholder will measure about 7—7.5 inches across.


Delights-Gem's Difficulty Rating: Easy

Background: While leading my first CAL (crochet a-long) using a different potholder pattern I learned that, while I prefer finer and medium density cottons, most of the participants preferred denser cottons such as Lily's Sugar 'n Cream, Pisgah's Peaches 'n Creme, and Lion Brand Lion Cotton to make their crocheted potholders. I had to modify that earlier pattern so everyone could create potholders no matter what yarns or threads they were using. Since that experience, I decided to develop a pattern designed just for users of heavier cottons. The Fanciful Flower Potholder is the result. No modifications for crocheting this potholder are offered for other cotton weights. Here is a photo of some popular U.S. brands of cottons.


Objective: The purpose of this blog page is to lead crocheters through the creation of one (or more) of these Fanciful Flower Potholders. To that end, written pattern instructions and photos are provided.
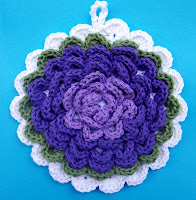
This Fanciful Flowers Potholder pattern is copyrighted. You are welcome to use it with these guidelines: Be sure to attribute this source when posting or presenting potholders made from this pattern and refrain from publishing or selling the pattern or representing it as your own. Otherwise, no other restrictions apply. Enjoy making these for selling, sharing, gifting or your own personal use.

Supplies: You will need the following materials and tools to complete this project.
  • 3—4 different colors of cotton yarn. (Heavier yarns such as Lily's Sugar 'n Cream, Pisgah's Peaches 'n Creme, and Lion Brand Lion Cotton.)
  • H hook (5mm)
  • scissors
  • tapestry or yarn needle (or you can substitute a small size crochet hook to fasten yarn ends)
For the example potholder in this tutorial, these are the colors and brands used:

  • A: White (Pisgah's Peaches 'n Creme)
  • B: Hot Purple (Lily Sugar 'n Cream)
  • C: Hot Grape (Lily Sugar 'n Cream)
  • D: Sage Green (Lily Sugar 'n Cream)
A few notes before starting: There is a lot of flexibility in the making of this potholder. That is, the exact number of stitches per round does not have to be absolute and changes in color can be made after any completed petal rounds.


The potholder (above) is the featured one for this tutorial. It has 3 hot purple petal rounds; three hot grape petal rounds; 1 sage green petal round and finally a scalloped edging of white.
Let's get started!
The starting point will be the back, or foundation, of the potholder on which the petals will be crocheted later. This part is all one color (color A) and all one stitch (rounds of half double crochets). The backside of this foundation potholder becomes the back of the potholder. The petals crocheted on this foundation make the potholder thick enough to be extra insulated for handling hot pans which means an additional back will not be necessary.


Foundation: With color A (white) and an H hook, ch 4. Sl st to the beginning ch to make a loop.
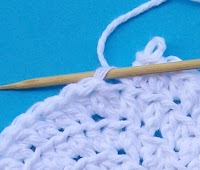

Round 1: Ch 2 (counts as first hdc), 8 hdc's in loop (9 total). DO NOT join. You will be crocheting one large, continuous spiral through round 8, you will work in BACK LOOPS, only. 
If you are unsure what is meant by a back loop, see the photo to the right in which a wooden skewer is placed into the back loop. The front loop is just under the skewer.


Place a marker in the first stitch of each round. On even numbered rounds, you will be finishing the round in the starting st. Simply remove the marker, work the round as indicated, then replace the marker in the first st of the next round. This will allow each future petal round to complete a full circle so that the petals move up a straight line.


NOTE: YOU DO NOT HAVE TO HAVE THE EXACT NUMBER OF STITCHES AT THE END OF ANY/ALL OF YOUR ROUNDS. THESE NUMBERS ARE ONLY SUGGESTIONS. THE PETALS DO NOT DEPEND UPON EXACT COUNTS IN YOUR ROUNDS. THIS IS A VERY FLEXIBLE AND FORGIVING PATTERN.

Round 2: 2 hdc's in back loop of ch 2 and in back loop of each hdc around, do not join, 2 hdc in the first st of this round. (20 st)
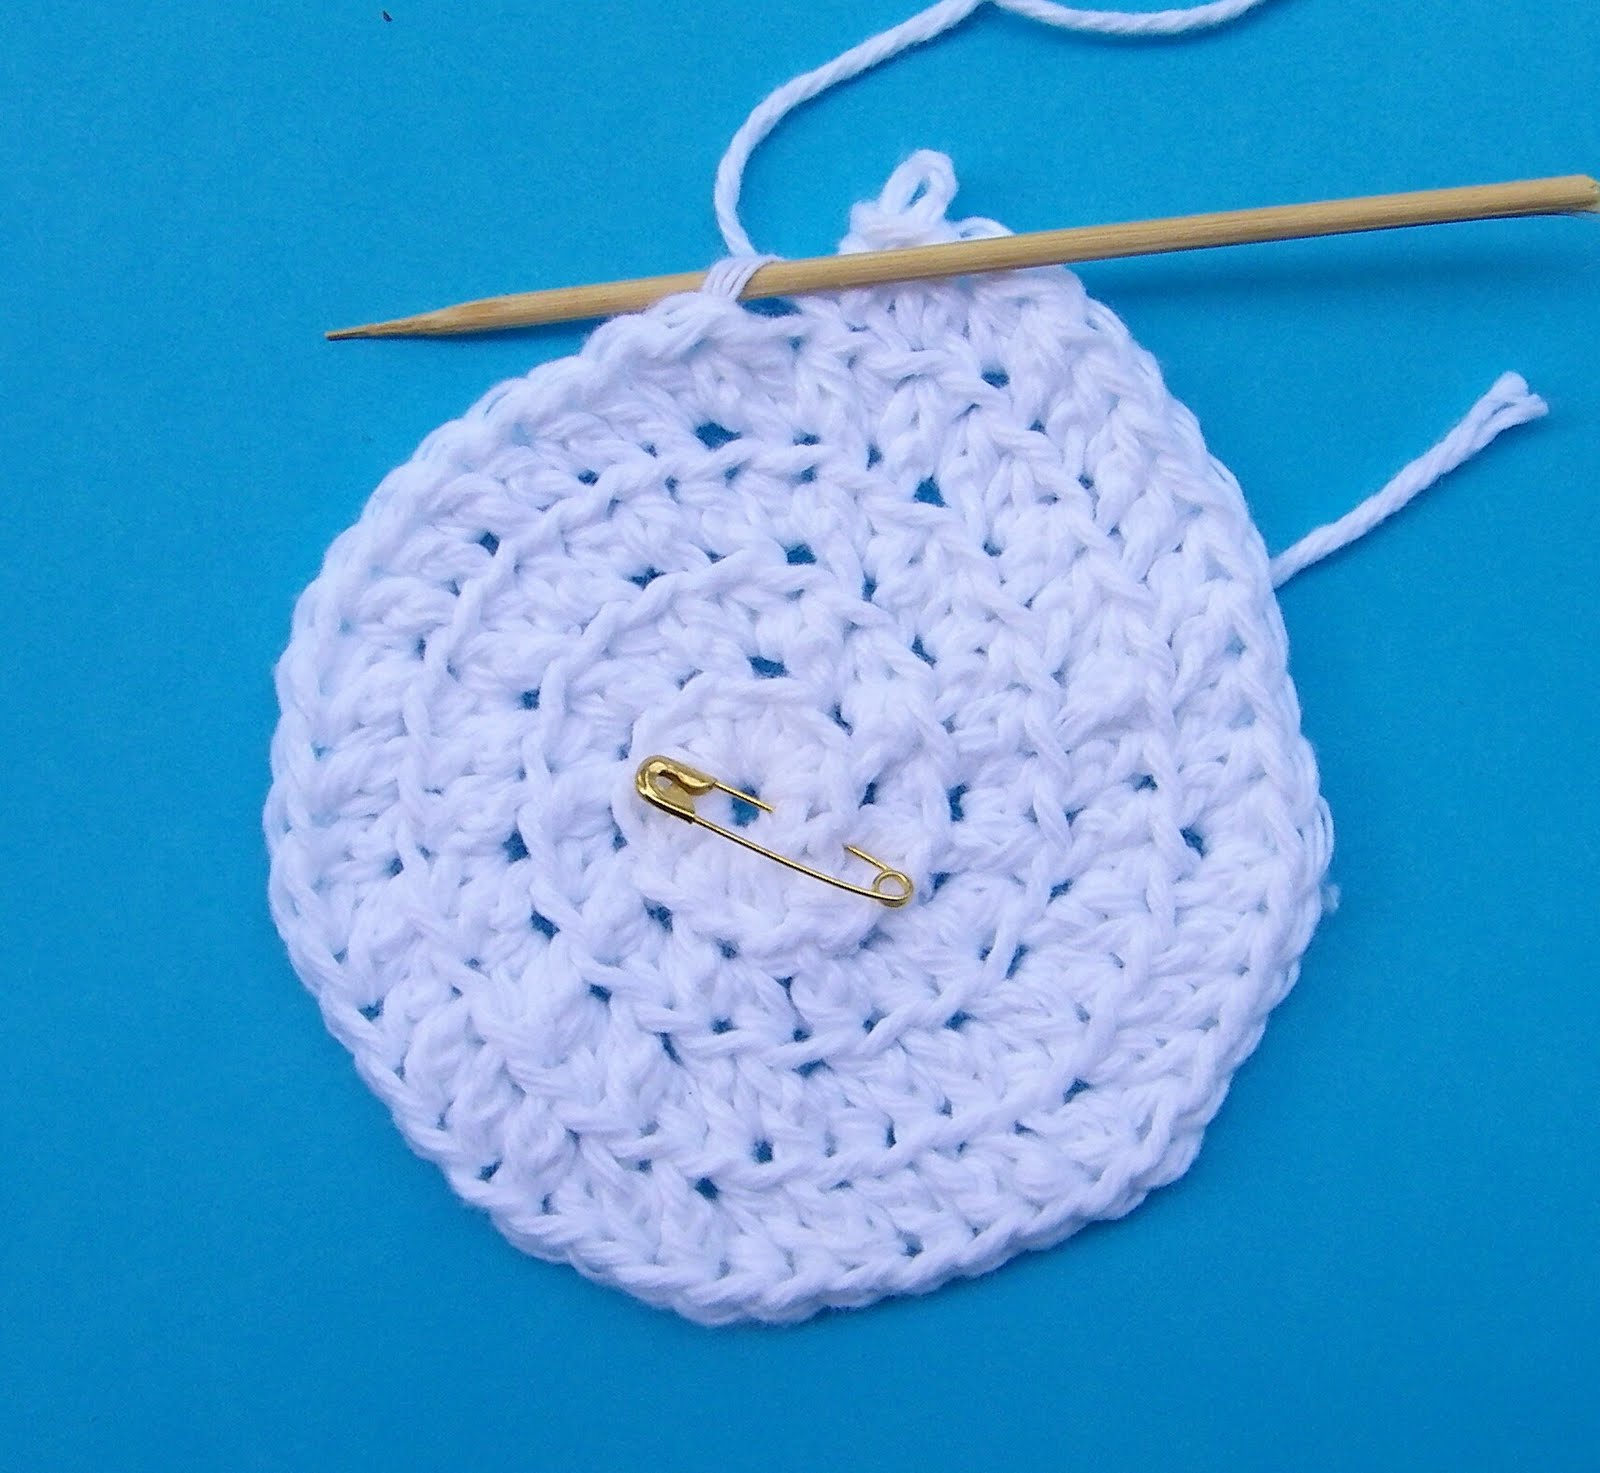
Round 3: *hdc in next st, 2 hdc in next st, repeat from * around, ending with hdc in last st. (28 st)

Round 4: *2 hdc in the next st, hdc in next 2 st, repeat from * around, ending with 2 hdc in last st, hdc in first st of this round. (38 st)

Round 5: hdc in next 2 st, *2 hdc in next st, hdc in next 3 st, repeat from * around. (46 st) 


Round 6: *2 hdc in next st, hdc in next 4 st, repeat from * around, ending with hdc in last st, hdc in first st of this round. (57 st)

Round 7: hdc in next 3 st, *2 hdc in next st, hdc in next 5 st, repeat from * around. (66 st)


Round 8
: *2 hdc in next st, hdc in next 6 st, repeat from * around, ending with hdc in last 2 st. (76 st) At the end of round 8, sc in next 2 st through back loops and then sl st in the next 2 st through both loops. This will help smooth out the end of your circle.


After 8 rounds, the foundation part of the potholder should measure between 6.25 and 6.5 inches across. The finished potholder will be about an inch larger when a final scalloped edge is completed.

Petals

Round 1: Starting at the first front loop at the center of the foundation potholder, attach Color B (Hot Orange) with a sl st. *In the next front loop: 5 dc's. Next front loop: sl st. Repeat from * around. 


Please note: ROUND 1 IS THE ONLY PETAL ROUND THAT YOU WILL CROCHET INTO ALL OF THE FRONT LOOPS. In all other petal rounds you will skip every other front loop.


Rounds 2—3: Continuing in a spiral, *skip the next front loop, 6 dc's in the next front loop, skip the next front loop, sl st in the next front loop. Repeat from * around.


Tips: 
• Change colors AFTER a completed round. 
• When joining a new color, join with a sl st in the last sl st of the previous color.

• While crocheting your petal rounds, you will need to scrunch up your work with your other hand to work the petal stitches. Handle your work in whatever way will allow you to crochet the petals into the loops. It is flexible and will lay flat when you smooth it at the end.

Rounds 4 and beyond: Continuing in a spiral, *skip the next front loop, 7 dc's in the next front loop, skip the next front loop, sl st in the next front loop. Repeat from * until you have one complete round of hdc's left


Photo on the right: This is the potholder with three colors: two purples and one green round. The only round left is a scalloped edging of white.


DO NOT make petals in the front loops of the final round. Instead, go through both loops when making the scalloped edge, as described next.


Final round (scalloped edge): Attach color A (your foundation color) to the top of your potholder with a sl st in both the front and back loops and leave a tail of 24 inches. (You will need this tail after you complete the round to assist in making a strong hanging loop.)  *Skip the next st, 7 dc's in the next st, skip the next st, sl st in the next st. Repeat from * around. 


By crocheting through both the front and back loops, your scallops on the final round will lie flat, which is what you want them to do. The petals stand up a bit; the scalloped edge lies down.


When you get back to the beginning of this scallop round, it's okay if there is a slight separation between the first and last scallops because this is where your hanging loop will go. Pick up the long starting tail of yarn from and chain 11 or 12 using both strands of yarn together. To complete the hanging loop, sl st to the potholder near the start of your chain. Secure yarn ends.


Secure all of the rest of your yarn ends, if you haven't done that already. You will find that hiding yarn ends will be easy by camouflaging them in or under petals. 


 All done! Wasn't that easy?


Special Thanks: to braydenbugsmoms for pattern testing and extra pattern support and to happyscraps for clarification and improvement of the foundation rounds. 


EXTRA: Flower Centers
Maybe you have made one of the potholders and now you are ready to extend your creativity with something a little beyond the basic potholder. How about make it pop with a special center? Here are some close-ups of some Fanciful Flower Potholder centers. The two on the top row feature a ring of French knots to simulate pollen. The two flowers on the bottom row feature (left) a round of clusters, instead of hdc's and (right) a circle of chain stitches going round and round in a spiral.


Here's a close-up to the left of one that I am working on so you can see the French knots at the center. Normally when you embroider your needle goes straight down and comes out the back. But because your back side is visible when done, it will be important that you DO NOT go straight down and have any work showing in the back. 


What I did to make the yellow only show on the front was to knot my cotton yarn and, because my center was already going to be knots, I inserted my needle sideways under/through a hdc post and made the knot appear on the right side to blend in with the French knots I was about to make. Then every time I made a French knot I also went under/through a post so that the yarn never penetrated the backside of my piece. I made about two dozen French knots here and then secured my yarn end. Now the petal rows can be started.


Here's an important tip: Besides being mindful to make your embroidery appear only on the front side, the other important tip is to embellish your center BEFORE you start your petal rows. Take it from me (because I did this backwards once) do it first. It is just too difficult to fancy it up after you have started crocheting into the front loops.


5/5/2012: Someone contacted me to say that there is a 1946 pattern that I "stole" and claimed for myself. I didn't. This anonymous person also sent me the link to the pattern so I looked it up and found that, while it is round and has petals, it is constructed very differently. Anonymous person, please check this 1946 source more closely in comparison and you will see how different these patterns are from each other. Also,if you check my blog further, you will see I attribute sources; I don't steal.  

Monday, April 25, 2011

The BIG 2011 Potholder Swap


April 25, 2011: Just over a year ago I was searching online for a potholder pattern. I kept finding references to a big potholder swap in which hundreds of participants sent in 5 crocheted potholders by a certain date after which the 5 potholders were replaced by 5 different ones made by 5 other participants and sent back. There were so many colorful, artfully executed potholders that I was hooked (accidental crochet pun). 


The word "ravelry" kept coming up in the many blogs that covered the event. I discovered that ravelry was a free online organization to which hundreds of thousands of members belonged. (There are now over one million members across the globe.) The site is dedicated to knitting, crocheting and spinning/weaving. I joined.

This year I crocheted my 5 potholders so I could participate in the annual potholder event; I was too late last year. This year's deadline was April 16, 2011; I sent my five on March 15, 2011. I am currently watching the mail for the 5 that will come back to me.

Overview of the swap (this info comes directly from the swap organizers): 
The Rules:

There’s no need to sign up or notify anyone in any way that you intend to swap. Have your potholders at the destination below by April 16 and you’ll be swapping. If you don’t have them there on time, they’ll be returned to you. Feel free to participate in the Flickr and Ravelry groups, but it’s not a requirement.
Your Potholders:
Each participant is required to crochet 5 potholders in the same pattern. Please do vary the colors as you see fit. We don’t want you bored to tears! Please be sure your hot pads and potholders measure between 6 and 8 inches across and are double thick. THEY MUST BE WITHIN THESE SIZE PARAMETERS OR THEY WILL BE RETURNED TO YOU. To make a double thick potholder, crochet the same pattern twice, or do a fancy side and a plain side, then join at the edge. Please make your potholders at a reasonably tight gauge. We don’t want burned fingers!
We’ll be using 100% cotton yarns exclusively. No blends, please.
Label each pad/holder with maker and care instructions. Feel free to include yarn and pattern info. Affix the label with a safety pin or tie it on. No straight pins, please. We had a lot of trouble with labels coming off during the first swap. We don’t want to accidentally send you one of your own potholders.
These are absolute requirements and if you don’t follow them, you won’t be able to swap.
The Actual Swapping:
After the potholders are received, your hosts are going to get together and have a grand time looking at all of your gorgeous work and selecting 5 different beauties to send back to you.
The goal of this swap is to produce and receive little pieces of crocheted art. Use beautiful yarns, color combinations, and patterns. Don’t feel pressured to use teensy little crochet cotton. Thicker cottons like Tahki Cotton Classic, Rowan Cotton Glace, and Elann Sonata make great potholders. Have a ton of fun.
Postage + Envelope:
US participants need to include a self-addressed, postage-paid, large First Class Envelope. You will have to provide your own Self-Addressed Stamped (Non-Priority) envelope. The current first class rate for a large envelope weighing up to 13 oz. is $3.75 (please note that this has changed from the original posting). We will make sure all packages stay under 13 oz. so that we’re sure your postage is covered. You will have to purchase the stamp(s) to cover this. Postal regulations have changed since the last swap, so to be sure you receive your package, we require first class envelopes only.
Non-US swappers, the only way for us to collect postage fees from you is PayPal. We expect packages to weigh under 10 oz., so postage should be between $4 and $8, depending on where you live. You must include your email address ON the outside of your package, with your address, so that we may email you for your postage fees. If you don’t, we won’t be able to contact you and send your package back.

My Potholders:
The five potholders I crocheted follow the basic rules: they are all of the same pattern and they are made of 100 percent cotton. The pattern is a variation of the Gahaelkelte Topflappen pattern. If would like more info on this pattern, tips, versions, etc. Click Here. This will also direct you to a site that translates the pattern from German to English. I changed the number of petals or spires from 16 to 14 because that worked best for me. I find 16 seems crowded and doesn't lay as flat as I would like. I used Tahki Cotton Classic and Omega Sinfonia to make the potholders and size F and G hooks.


In keeping with the German name of the original pattern, I asked my oldest son, Brian, who speaks German to tell me what Flower Potholder would be in that language and he emailed me "Blumentopflappen." That's what I decided to call this variation.


Swap organizers have emphasized that labels or tags need to be secure. In past years when tags came off potholders they found it difficult to match them with the potholders. I decided to make sure the tags were secured but in addition I made tags that included a photo of the five potholders on them so a visual connection was easily made just in case one came loose. I also used matching ribbon on the tags the same color as the center and edge of each potholder. That is, if the potholder had a yellow center and edging, then the attaching ribbon was yellow. Here is a picture of the potholder backs with the tags attached. I also added some visual and textural interest to the tags by applying a product called Glossy Accents to the picture of the five potholders.


April 27, 2011
I received my five potholders today back from the swap. Here is the photo.


Potholder 1: Starting at the top with the bright colored red, orange and hot pink one, the tag only indicates the maker's first and last names and from Seattle. By checking on the potholder group site I found that her ravelry name is schnitzel. Rather than give her real name, I am including her pseudonym. I understand the pattern name of this potholder is called "Kaleiscope." The yarn feels like Peaches and Creme or Sugar 'n Cream.


Potholder 2: Continuing clockwise, the potholder with the white background and red center was made by sonjar (her ravelry name) from Albany, OH in the African flower design on the front with a bobble shell edging to join the front and back. The back uses the same colors as the front but is more of a plain hexagon design in tight sc's. Sonjar used Reynolds Saucy Sport, 100% mercerized cotton.


Potholder 3: Next is a potholder by Melissa who gives a web address of oceaniaknits (hard to read but I think that's it) on the tag. Neither the pattern name nor the type of cotton used was included. This potholder is the one in maroon, dark plum and off white colors.


Potholder 4: The potholder that is in a granny square-type design and featuring bright yellow as the predominant color, was made by pawsandknit. She used Scheepjes Granada cotton to make this potholder.


Potholder 5: Unfortunately this last potholder, the one with the medium blue edge and dark blue center, has a tag without anything written on it: no name, no yarn, no pattern name. Ironically, I recognize the pattern as one that I originated and which I call the Ripple Potholder. This pattern and many variations, tips, colors and embellishments can be found on my blog. UPDATE: "smacklet" recognized the potholder and messaged me that "I can't believe I did that!" (attached a blank tag) So the mystery is solved. 

Saturday, April 9, 2011

Egg-citing Ukrainian Eggs


At the time of this posting it is April and nearly two weeks before Easter, 2011. Lately I have been sharing Easter egg cozy patterns to knit or crochet, which are fun and lighthearted, but now it's time to shift gears and share something more traditional and very beautiful—Ukrainian eggs. I have admired the beauty of this art form since I was a teen after seeing amazing photographs of them in a National Geographic magazine. 


One of my ravelry friends, Suzy, makes Ukrainian eggs (seen above) and it is my pleasure to share a few of her eggs with you and to tell you a little about them, in general. 


Here are two of Suzy's eggs, which she sells on etsy. I'll provide a link at the end of this blog page to her tutorial on making them and another link to her etsy shop, in case you are inspired to purchase one to include as a part of your Easter traditions. Suzy calls the egg on the left, "Birds of a Feather" and it is a good representative of the geometric shapes often seen on Ukrainian eggs. The photo on the right is an egg that she calls "Bumblebee Party." 


A Little Info About Ukrainian Eggs


What: Remember when you were a child and you used a crayon to write your name or draw a flower or heart on an egg before lowering down it into the cup of egg dye? If so, you will understand in a limited way about the process of making Ukrainian eggs. Ukrainian eggs are decorated eggs that go through a series of dye colors but instead of using a crayon between the color baths, a more finite stylus-type tool called a kystka or kistka is loaded with hot beeswax to scribe lines and designs onto the egg. These fine lines of wax prevent the dye from penetrating so that whatever color is underneath the wax at that step is preserved as it goes into the next color. The dyes start with lighter colors, like yellow, and go through progressions of colors to end with darker ones, such as black or purple. 


At the conclusion, when all of the dye baths are complete, the egg is mostly covered with wax which then needs to be removed. The egg is carefully warmed so that the softened beeswax can be gently wiped away to reveal a treasured, jewel-toned keepsake: a pysanka


Pysanka is the word given to a Ukrainian egg. It comes from the word psyalty which means "to write" because the lines and designs are meticulously scribed, like writing, with wax using the kystka, rather than painted with a brush. 


Where: Since the term "Ukrainian" is so prominent in this art form, it might be helpful to show you where this country is located and where this form of decorating eggs evolved. The Ukraine is in Eastern Europe where some of its nearest neighbors are Russia, Poland and Hungary. It also borders on the Black Sea. 


Who: After the children were put to sleep at night, Ukrainian women set about creating their eggs by candlelight. Because each egg is such a fine work of art, it could take a few evenings from start to finish for just one egg. With plans to share an individually designed egg for each family member, plus eggs for friends and significant community leaders, preparations began many weeks before Easter to complete all of the eggs in time for an Easter morning blessing by the priest at church. The larger the family and their community connections, the more eggs had to be readied. In a large, extended family as many as 60 eggs might need to be completed and that would be more than one woman could produce in a matter of weeks. As a consequence, mothers passed down their designs and secrets for making the eggs to their daughters. Working side by side, mothers and their older daughters created the eggs and thus by sharing and cooperative creating, the tradition was also kept alive from generation to generation over hundreds of years. 

When: Long before Christianity was introduced to this geographical area, Ukrainian women decorated eggs. Because of their relative fragility, early samples did not survive but ceramic replications dating back to ancient times have been found. The eggs and design symbols, once representing deities, later took on Christian meanings and became associated with Easter. The egg itself represented new life, the important Easter message. Added designs and motifs refined or enhanced the meanings beyond the basic symbolism of the egg itself.

There were times in the history of the Ukraine when outside invaders and occupiers attempted to suppress the tradition of pysanky. As Ukrainian families escaped or immigrated into other countries they brought their traditions with them, including how to make the decorated eggs. By settling in North and South America, in particular, the eggs have found appreciative new audiences and even individuals, not brought up in the tradition, who aspire to create them because of their beauty.

So, how does an egg go from this
.....to this?


The question of "from this...to this" is what Suzy demonstrates in her step-by-step tutorial. Even if you don't plan to ever make an egg for yourself, you might want to see how the process goes from a plain egg to a finely decorated one. To appreciate art, it's good to know the patience, love and skill that goes into the creation.


To visit Suzy's Ukrainian egg tutorial:  Click Here   


To visit Suzy's Artsy Crafty Store on etsy:  Click Here