


Introduction: These Fanciful Flower Potholders are made of 100 percent dk weight cottons in bright and bold colors. Cotton is the preferred yarn for potholders because acrylic yarns can melt when handling hot pans or dishes.

What to Expect: Your first Fanciful Flower potholder may take a little longer but after that, you can probably crochet one in under two hours. The finished potholder will measure about 7—7.5 inches across.

Delights-Gem's Difficulty Rating: Easy
Background: While leading my first CAL (crochet a-long) using a different potholder pattern I learned that, while I prefer finer and medium density cottons, most of the participants preferred denser cottons such as Lily's Sugar 'n Cream, Pisgah's Peaches 'n Creme, and Lion Brand Lion Cotton to make their crocheted potholders. I had to modify that earlier pattern so everyone could create potholders no matter what yarns or threads they were using. Since that experience, I decided to develop a pattern designed just for users of heavier cottons. The Fanciful Flower Potholder is the result. No modifications for crocheting this potholder are offered for other cotton weights. Here is a photo of some popular U.S. brands of cottons.

Objective: The purpose of this blog page is to lead crocheters through the creation of one (or more) of these Fanciful Flower Potholders. To that end, written pattern instructions and photos are provided.
 Round 3: *hdc in next st, 2 hdc in next st, repeat from * around, ending with hdc in last st. (28 st)
This Fanciful Flowers Potholder pattern is copyrighted. You are welcome to use it with these guidelines: Be sure to attribute this source when posting or presenting potholders made from this pattern and refrain from publishing or selling the pattern or representing it as your own. Otherwise, no other restrictions apply. Enjoy making these for selling, sharing, gifting or your own personal use.
Supplies: You will need the following materials and tools to complete this project.
- 3—4 different colors of cotton yarn. (Heavier yarns such as Lily's Sugar 'n Cream, Pisgah's Peaches 'n Creme, and Lion Brand Lion Cotton.)
- H hook (5mm)
- scissors
- tapestry or yarn needle (or you can substitute a small size crochet hook to fasten yarn ends)
For the example potholder in this tutorial, these are the colors and brands used:
- A: White (Pisgah's Peaches 'n Creme)
- B: Hot Purple (Lily Sugar 'n Cream)
- C: Hot Grape (Lily Sugar 'n Cream)
- D: Sage Green (Lily Sugar 'n Cream)

A few notes before starting: There is a lot of flexibility in the making of this potholder. That is, the exact number of stitches per round does not have to be absolute and changes in color can be made after any completed petal rounds.

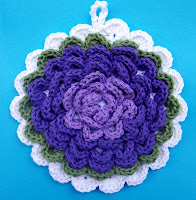
The potholder (above) is the featured one for this tutorial. It has 3 hot purple petal rounds; three hot grape petal rounds; 1 sage green petal round and finally a scalloped edging of white.
Let's get started!
The starting point will be the back, or foundation, of the potholder on which the petals will be crocheted later. This part is all one color (color A) and all one stitch (rounds of half double crochets). The backside of this foundation potholder becomes the back of the potholder. The petals crocheted on this foundation make the potholder thick enough to be extra insulated for handling hot pans which means an additional back will not be necessary.
Foundation: With color A (white) and an H hook, ch 4. Sl st to the beginning ch to make a loop.
 Round 1: Ch 2 (counts as first hdc), 8 hdc's in loop (9 total). DO NOT join. You will be crocheting one large, continuous spiral through round 8, you will work in BACK LOOPS, only.
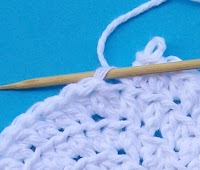
If you are unsure what is meant by a back loop, see the photo to the right in which a wooden skewer is placed into the back loop. The front loop is just under the skewer.
Place a marker in the first stitch of each round. On even numbered rounds, you will be finishing the round in the starting st. Simply remove the marker, work the round as indicated, then replace the marker in the first st of the next round. This will allow each future petal round to complete a full circle so that the petals move up a straight line.
NOTE: YOU DO NOT HAVE TO HAVE THE EXACT NUMBER OF STITCHES AT THE END OF ANY/ALL OF YOUR ROUNDS. THESE NUMBERS ARE ONLY SUGGESTIONS. THE PETALS DO NOT DEPEND UPON EXACT COUNTS IN YOUR ROUNDS. THIS IS A VERY FLEXIBLE AND FORGIVING PATTERN.
 Round 1: Ch 2 (counts as first hdc), 8 hdc's in loop (9 total). DO NOT join. You will be crocheting one large, continuous spiral through round 8, you will work in BACK LOOPS, only.
 If you are unsure what is meant by a back loop, see the photo to the right in which a wooden skewer is placed into the back loop. The front loop is just under the skewer.
Place a marker in the first stitch of each round. On even numbered rounds, you will be finishing the round in the starting st. Simply remove the marker, work the round as indicated, then replace the marker in the first st of the next round. This will allow each future petal round to complete a full circle so that the petals move up a straight line.
NOTE: YOU DO NOT HAVE TO HAVE THE EXACT NUMBER OF STITCHES AT THE END OF ANY/ALL OF YOUR ROUNDS. THESE NUMBERS ARE ONLY SUGGESTIONS. THE PETALS DO NOT DEPEND UPON EXACT COUNTS IN YOUR ROUNDS. THIS IS A VERY FLEXIBLE AND FORGIVING PATTERN.
Round 2: 2 hdc's in back loop of ch 2 and in back loop of each hdc around, do not join, 2 hdc in the first st of this round. (20 st)

Round 4: *2 hdc in the next st, hdc in next 2 st, repeat from * around, ending with 2 hdc in last st, hdc in first st of this round. (38 st)
Round 5: hdc in next 2 st, *2 hdc in next st, hdc in next 3 st, repeat from * around. (46 st)
Round 7: hdc in next 3 st, *2 hdc in next st, hdc in next 5 st, repeat from * around. (66 st)

Round 8: *2 hdc in next st, hdc in next 6 st, repeat from * around, ending with hdc in last 2 st. (76 st) At the end of round 8, sc in next 2 st through back loops and then sl st in the next 2 st through both loops. This will help smooth out the end of your circle.
After 8 rounds, the foundation part of the potholder should measure between 6.25 and 6.5 inches across. The finished potholder will be about an inch larger when a final scalloped edge is completed.
Petals
Round 1: Starting at the first front loop at the center of the foundation potholder, attach Color B (Hot Orange) with a sl st. *In the next front loop: 5 dc's. Next front loop: sl st. Repeat from * around.
Please note: ROUND 1 IS THE ONLY PETAL ROUND THAT YOU WILL CROCHET INTO ALL OF THE FRONT LOOPS. In all other petal rounds you will skip every other front loop.

Rounds 2—3: Continuing in a spiral, *skip the next front loop, 6 dc's in the next front loop, skip the next front loop, sl st in the next front loop. Repeat from * around.
Tips:
• Change colors AFTER a completed round.
• When joining a new color, join with a sl st in the last sl st of the previous color.
Rounds 4 and beyond: Continuing in a spiral, *skip the next front loop, 7 dc's in the next front loop, skip the next front loop, sl st in the next front loop. Repeat from * until you have one complete round of hdc's left.

Photo on the right: This is the potholder with three colors: two purples and one green round. The only round left is a scalloped edging of white.
DO NOT make petals in the front loops of the final round. Instead, go through both loops when making the scalloped edge, as described next.
Final round (scalloped edge): Attach color A (your foundation color) to the top of your potholder with a sl st in both the front and back loops and leave a tail of 24 inches. (You will need this tail after you complete the round to assist in making a strong hanging loop.) *Skip the next st, 7 dc's in the next st, skip the next st, sl st in the next st. Repeat from * around.
By crocheting through both the front and back loops, your scallops on the final round will lie flat, which is what you want them to do. The petals stand up a bit; the scalloped edge lies down.
When you get back to the beginning of this scallop round, it's okay if there is a slight separation between the first and last scallops because this is where your hanging loop will go. Pick up the long starting tail of yarn from and chain 11 or 12 using both strands of yarn together. To complete the hanging loop, sl st to the potholder near the start of your chain. Secure yarn ends.
Secure all of the rest of your yarn ends, if you haven't done that already. You will find that hiding yarn ends will be easy by camouflaging them in or under petals. All done! Wasn't that easy?
Special Thanks: to braydenbugsmoms for pattern testing and extra pattern support and to happyscraps for clarification and improvement of the foundation rounds.
EXTRA: Flower Centers
Maybe you have made one of the potholders and now you are ready to extend your creativity with something a little beyond the basic potholder. How about make it pop with a special center? Here are some close-ups of some Fanciful Flower Potholder centers. The two on the top row feature a ring of French knots to simulate pollen. The two flowers on the bottom row feature (left) a round of clusters, instead of hdc's and (right) a circle of chain stitches going round and round in a spiral.
 |  |
 |  |

What I did to make the yellow only show on the front was to knot my cotton yarn and, because my center was already going to be knots, I inserted my needle sideways under/through a hdc post and made the knot appear on the right side to blend in with the French knots I was about to make. Then every time I made a French knot I also went under/through a post so that the yarn never penetrated the backside of my piece. I made about two dozen French knots here and then secured my yarn end. Now the petal rows can be started.
Here's an important tip: Besides being mindful to make your embroidery appear only on the front side, the other important tip is to embellish your center BEFORE you start your petal rows. Take it from me (because I did this backwards once) do it first. It is just too difficult to fancy it up after you have started crocheting into the front loops.
5/5/2012: Someone contacted me to say that there is a 1946 pattern that I "stole" and claimed for myself. I didn't. This anonymous person also sent me the link to the pattern so I looked it up and found that, while it is round and has petals, it is constructed very differently. Anonymous person, please check this 1946 source more closely in comparison and you will see how different these patterns are from each other. Also,if you check my blog further, you will see I attribute sources; I don't steal.
Goodness gracious! Another beautiful winner!!! These are FABULOUS!
ReplyDeleteI love these! Linking up at Tangled Happy next week. Thanks for sharing this. :)
ReplyDeletenice!!
ReplyDeletehugs
c@
Claudia,
ReplyDeleteThank you so much for sharing your pattern so generously ...
I love it.
Camilla
Thanks so much for sharing! I've been planning to make some potholders for my kitchen, and these are so happy and fun! Can't wait to start hooking!
ReplyDeleteThis is absolutely beautiful! Thank you so much for sharing this pattern. I intend to make a garden of them for my kitchen and will be making some for gifts for my family. This is the prettiest potholder I've seen!
ReplyDeleteBlessings - Julie
these are fabulous! i think i'll make some smaller ones and wear them as brooches! thank you so much for sharing. will be linking if you don't mind! :D
ReplyDeleteTrish, be my guest (about the linking).
ReplyDeleteThanks to everyone for the nice comments.
These are absolutely GORGEOUS!!!!!
ReplyDeleteAlready printed. Already a new follower. Already for your next project.
ReplyDeleteJust what I've been looking for.
Wonder what is next on the crocheting block for us ladies. Can't wait.
ReplyDeleteHow fun are these! I'm slowly renovating my potholder supply right now and will have to try this. The multi-layer approach is a great idea - beautiful AND practical. Thanks for sharing.
ReplyDeleteThanks for sharing ur lovely pattern. IT is absolutely stunning.
ReplyDeletei made 2 this morning, they ROCK!
ReplyDeleteThese potholders are beautiful. Thank you so much for sharing your pattern. I love your colors too.
ReplyDeleteso cute!!!
ReplyDeleteFun to make, colorful and easy. I can do these even when my arthritis is at its peak-ok, I do have to pause and rub my hands but I can do them-colorful and cheery. Thank you so much for posting!!
ReplyDeleteI LOVE these! I plan on making a few to hand on the wall in my daughter's room. Thanks for sharing!!!
ReplyDeleteI love these happy little works of art! Thanks for sharing :)
ReplyDeleteThank you for posting this pattern. I love it!
ReplyDeleteCarol @ UKnitMe.blogspot.com
My grandma's sister-in-law saw the one that I made for my grandma and said that it was the most beautiful thing that she ever saw. So I'm making her one. Thanks for sharing this pattern!
ReplyDeleteHow many do you think I can make by Christmas???
ReplyDeleteI enjoy your work and made some of the potholder and even gave one or two (2) as gifts.
ReplyDeleteMany thanks
Mary O - New York State
This is where you got your pattern from you thief.
ReplyDeletehttp://web.archive.org/web/20080622053832/www.angelfire.com/folk/celtwich/Prettypetals.html
What a horrible, awful thing to say to someone nice enough to share her beautiful pattern with you!!! Jealous much?? You don't even have the nerve to put your name on your accusation! Some folks are just mean to be mean!
DeleteDear Delights, Thank you for this pattern and tutorial! I love it and am on my second one!
~ Betty Johnson
Thanks for your supportive words and for honoring the Delight-Gems blog by choosing to make potholders from this pattern. It is because of nice folks like you that blogging about them is worth the time and effort.
DeleteBTW, I have more new potholder patterns but am so busy that time seems to slip away from me these days. Now, if only I could clone myself...
The pretty petals is a totally different pattern. It's obvious SOMEBODY can't read a pattern. Good grief. Trolls suck!
DeleteThank you for sharing! I love this project, I can't wait to get started
ReplyDeleteAnonymous May 5 2012, these 2 patterns are not even close to being the same, so how can this lady be a thief. Totally different methods. So does this mean that everyone that makes a flower but they are different from someone elses that they are a thief because they made a similar flower.
ReplyDeleteJealousy, stupidity and bad manners are a very common thing to find around the internet. My guess is such people are just to be ignored.
ReplyDeleteAbout your pattern.... I think it is really nice and I just started to make one, hope to tell you how it came out... You are a lovely person for sharing so lovely things....
Just the project I was looking for, thanx so much for the creativity and inspiration :)
ReplyDeleteI truley love your pattern. I made two for a friend and I am fixing to start another two for another friend, Thank you for sharing it with us.
ReplyDeleteIt's brilliant. I used it to make my daughter's hat when she played the flower witch in the school play. I had to make one for each of the teachers after that lol http://www.flickr.com/photos/eddy_g/8410266223/
ReplyDeleteEddy G. How fun! Thanks for sharing your unique adaptation of this pattern.
ReplyDeletefinally I was able to understand step by step how to make them, after looking on the internet for very long. Thank you very much for sharing the pattern with us but especially for teaching us how to make it!
ReplyDeleteYou are the best
Thanks for your nice comment.
ReplyDeleteAnd thanks to all of you who have taken time to post your gracious comments and kind words. They are appreciated.
Claudia
Confused by your tips when you mention scrunching your work to get at the back loop, I thought the petals are crocheted in the front loop. Is this just an editing error
ReplyDeleteYes, it is an editing error and I am happy that you caught it so I could correct it. Thanks!
ReplyDeleteThese flowers are beautiful! I have made one for a swap, 2 as gifts, and my mother just asked me to make one in Florida state colors for her friend for Christmas. Thank you so much for sharing your creativity!
ReplyDeleteWhat a terrific pattern. Thank you! :)
ReplyDeleteLee Ann
Http://crochetgottaloveit.blogspot.com
Hi, I just wanted to say that the person who said this was a stolen pattern from 1946 should take the time to actually read a pattern before making a comment like this. While the two patterns may look similar they are not the same in stitches. I still have the 1946 booklet the original came in and made so many of those when I was age 7 that I got tired of doing the same thing over and over. I am almost 70 now and you did a great job with this pattern. Thank you for your time and making it available for free.
ReplyDeleteNice pot holder!! Hope I get this and can make one! Thanks for sharing!!
ReplyDeleteThank you for making this beautiful pattern available. I love it so much, I'd like to make 1 giant pot holder rug. Would you please tell me how you figured your increases, so that I may continue on? Thanks again!
ReplyDeleteAs I have not created a "giant potholder rug" before, I am not sure about the increases, though they seem to go in a pattern of one less increase per round as you keep going. You might try that. Fewer increases as the the project gets bigger around.
ReplyDeleteThank you very much!
DeleteI just LOVE these!! I have already made a passel of them. I just started a crochet blog and would love to show my work and give your link of where I found the pattern if that would be okay... Thank you for sharing your wonderful patterns here!! http://stringingwithheart.com
ReplyDeleteI just LOVE these!! I have already made a passel of them. I would love to show them off on my website, maybe even in a compilation of that would be okay, linking back to your beautiful website. ( I saw no other way to contact you than here ). But thank you so much for sharing your wonderful patterns!! :)
ReplyDeleteThank you for your nice comments. And thanks for asking for permission. You have my blessing to show them on your website.
ReplyDeleteMy pleasure....