Sunday, April 29, 2012

Chap Stick Holders

Not long ago, one of my ravelry friends (braydendbugsmom a.k.a. Christina) sent me a package filled with crafting goodies. Among the goodies was a package of fruit buttons. I was inspired by these little buttons to make some chap stick holders. Actually, Christina was the one who originally shared the chap stick holder idea with me via another ravelry member. 


Here's what I made.


At the time that I crocheted these little chap stick holders (known to some of you as lip balm holders), I was participating in April's group challenge on ravelry in the From Trash to Treasures group, the subject of which was to create something reminiscent of spring. These fruity holders fit right in. Then because I was on a roll and we were still creating spring things, I made some flower chap stick holders, too. I'm sure I would not have come up with the idea if I had not been inspired by my participation in the group challenge.


Here are the flower chap stick holders.
I free-formed these holders so there is no pattern for the flowers. Patterns with the shank buttons (similar to the fruit button holders) are available, however. Unlike the button/loop closures, the flower holders close by using velcro under the center leaf. The following photo shows one open holder in which you can just barely make out the velcro at the top of the crocheted tube/stem. The reason that the closure is barely distinguishable is because I used matching green velcro to camouflage it. 

The fruit chap stick holders are available in one of my etsy shops: Click Here 
The flower chap stick holders are available in another of my etsy shops: Click Here for Flowers


(Each comes with a handcrafted pillow box for gift-giving.)


Anyway, I thought I would post these little items for those of you who might like to try your hand at making chap stick holders. Maybe my little fun experimentation crocheting these will inspire you.


P.S. Thanks, Christina for the buttons and for earlier sharing the link to the chap stick holder how-to pattern. This was fun. 

Thursday, March 1, 2012

2Good2Eat

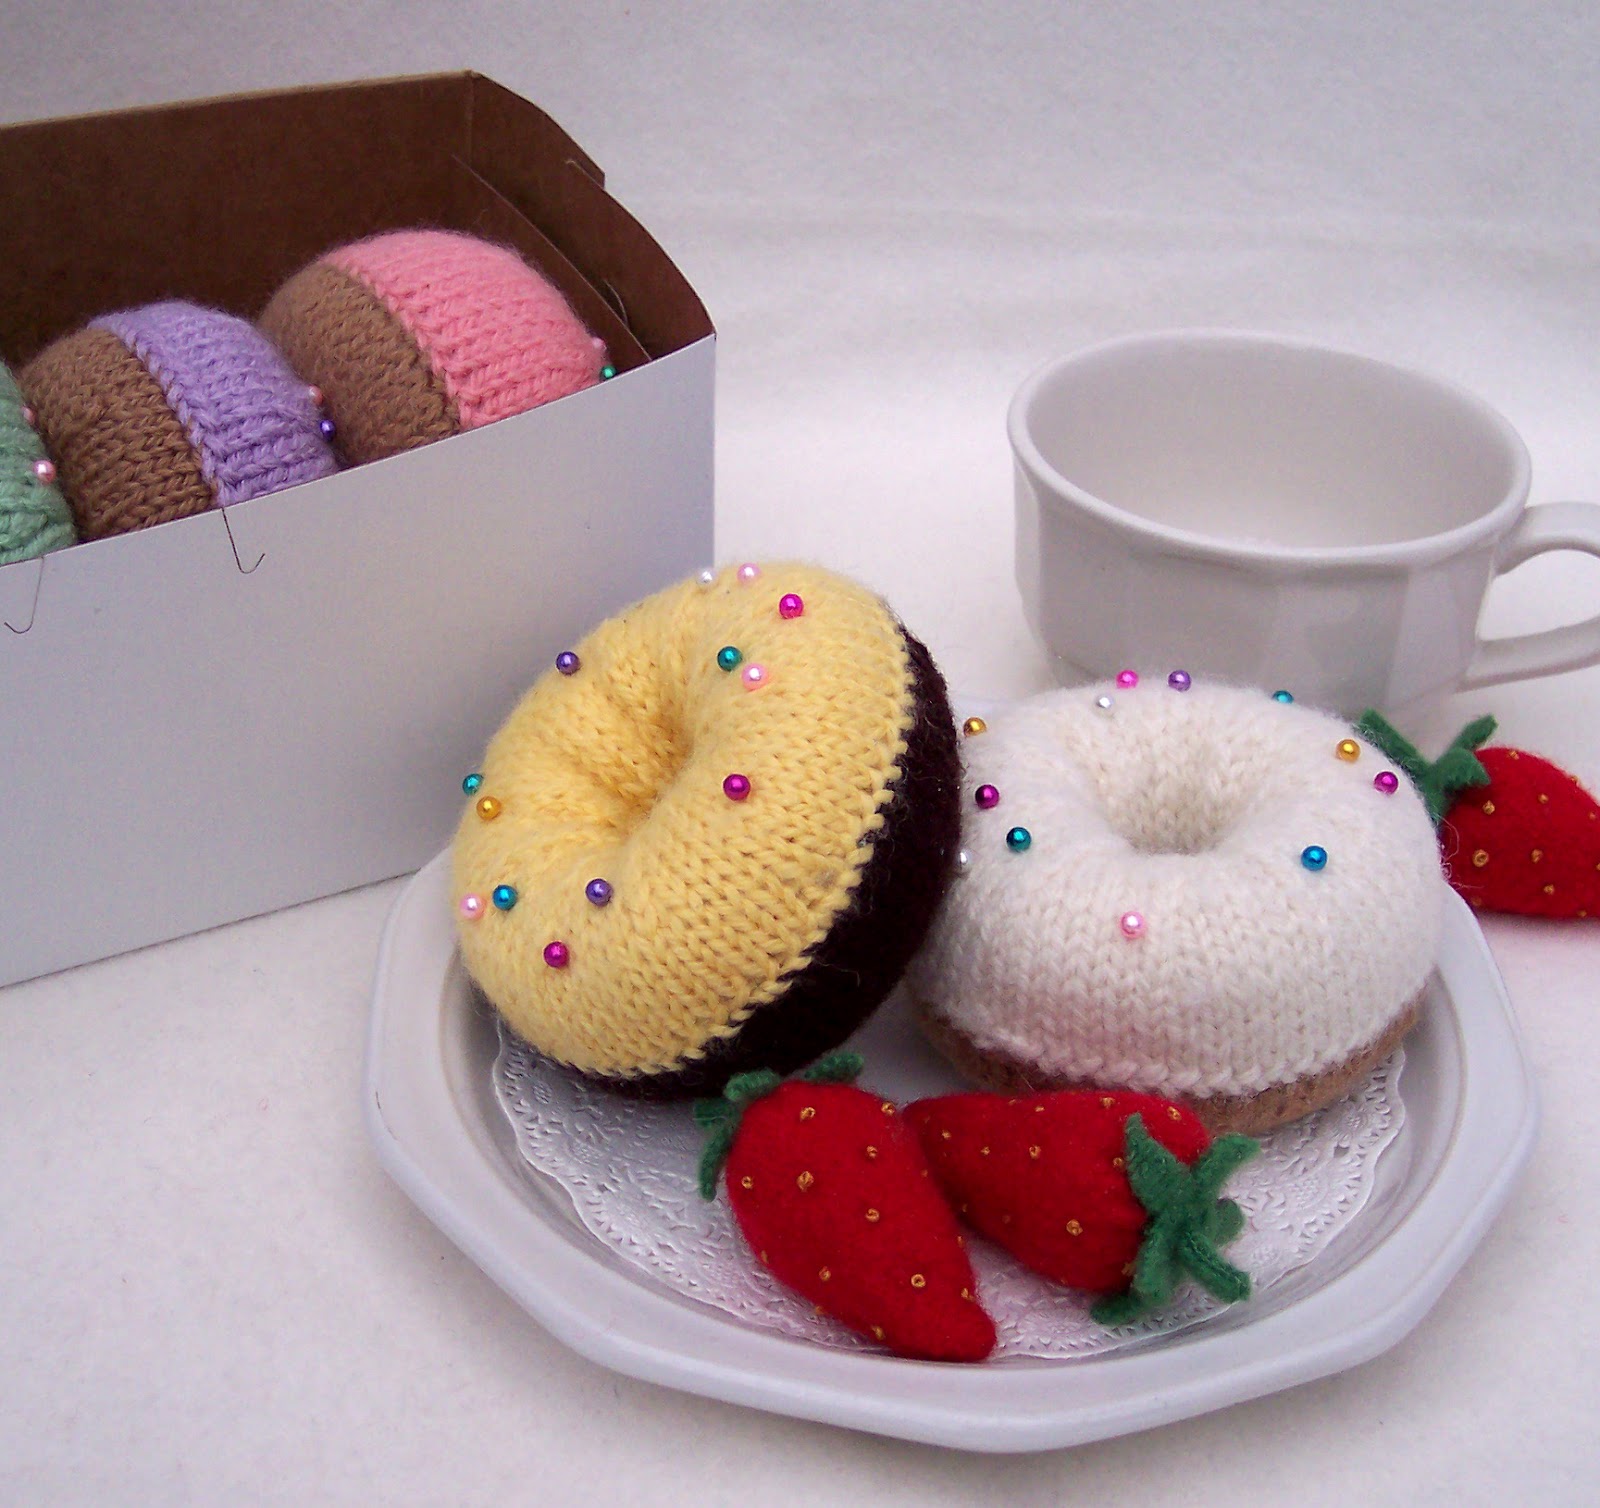
As if I don't have enough to do, I've inaugurated a third etsy shop called 2Good2Eat. Well, it was inevitable with so many fun and fanciful non-edible goodies to create. How could I not think of a shop filled with cupcakes, doughnuts, sundaes and other yummy delights? AND, they serve useful purposes, too.


ABOVE: Here's my new (for now) shop banner with yellow and white doughnuts which are actually knitted pincushions. One doughnut features lemon "frosting" over a dark chocolate base and the other is vanilla over a regular cake doughnut. They look yummy enough to eat but you wouldn't want to take a bite or you would have a mouthful of yarn and worst of all—straight pins. Yes, that's right, the "sprinkles" are actually metallic headed pins.


SECOND PHOTO: Here is the photo from which the narrow banner was extracted so you can see more of the doughnuts. I even found a doughnut box for this photo. Look at the variety of frosted doughnuts inside!

I found a great little pattern for these knitted doughnuts and want to share a link with you so you can make them, too. First, though, it is important to explain a few modifications I recommend for best results using the pattern. 

Modifications:
1. The pattern calls for size 0 (2 mm) needles. The reason given for such small needles is to make the stitches tight for use as a pincushion. Instead, I used wool yarn and larger needles: size 6 (4.25 mm) and size 7 (4.5 mm). After finishing and stuffing the pincushions, I felted the doughnuts by putting them in with a load of towels in the washer and then dried them in the dryer with the towels. The felting (shrinking and fusing of fibers) made the stitches closer together. Be sure to have plenty of towels or clothing items in with your doughnut(s) because it is the agitation that makes for successful felting.

2. The pattern does not provide a finished size for the doughnuts but mine have a footprint of 3.5 inches (9 mm) to 4.5 inches (11.5 mm). I think this size is larger than might be yielded with size 0 (2 mm) needles. 

3. After making a batch of these doughnuts, I found it best to use a slightly smaller size needle for the frosting half and a slightly larger size needle for the bottom (cake part) to make them even. 

4. The pattern suggests using poly fiberfil for the inner stuffing. I found that this type of product, used in most decorative pillows, is not substantial enough to confidently support sharp pins and needles. It is too squishy and doesn't have a heavy enough feel. Instead, I rolled up felted wool (not too tight, not too loose of a roll) from old sweaters and made an inner ring around which the knitted outer doughnut fits. To do this, I made sure that the wool was wide enough so that the rolled cylinder was longer than necessary. Once rolled, then I basted the long edge to keep it together. I placed the knitted doughnut around the cylinder and began stitching the doughnut together. When I had about two thirds of the doughnut stitched, I trimmed the cylinder to size and hand stitched the cylinder layers together working from the back to the front. DON'T leave out this step; the cylinder must form a neat ring by being joined or your doughnut will not be uniform. 

Links:
Okay, so here is the link to the pattern: Knitted Doughnut

And, be sure to drop by for a visit to my new etsy shop:  2Good2Eat

Finally, these are the best kind of doughnuts—ZERO calories!


Tuesday, February 21, 2012

Love Is Something If You Give It Away


There is an old song that goes, "Love is something if you give it away… you'll end up having more." This blog post is about "love" given away on Valentine's Day in Wrangell, Alaska.
Here's the story: Suzie B., head cook at Wrangell Medical Center, saw a photo of my Valentine brooches and an idea came to mind. She thought it would be a cheery surprise for the 18 longer term care patients at the center to receive heart pins for Valentine's Day. She went to Jane B., who heads up the center's support services, with her idea. Jane embraced it and they went in together on the purchase of the brooches. 


Once contacted, I selected the brooches and attached them on individual cards which I mounted on a covered piece of cardboard made to fit perfectly into a special box. The other two brooches were wrapped in tissue and placed loosely in the box with the others. Off the box went to Wrangell in plenty of time for the intended Valentine surprise. Above: This is the photo of 16 of the brooches as they appeared mounted on the display cardboard. Strips of gauze-type ribbon kept the cards and pins in place.


The day before Valentine's Day, Suzie and Jane took the pins to the center's day room and handed them out. Suzie says, "They were so happy and thrilled to receive them and wanted them pinned on." Sixteen of the recipients were women and two were men. One of the men opted to look at his rather than have it pinned on but everyone else proudly and happily wore and displayed their special Valentine brooches. 


Suzie shares, "It was a wonderful feeling to give these seniors little gifts that brought them joy.


Now we have come full circle, back to the song, "Love Is Something If You Give It Away." Referring to love, another part of the song goes: It's just like a magic penny—hold it tight and you won't have any but lend it, spend it, and you'll have so many, they'll roll all over the floor. So, while Suzie and Jane were giving love away on this Valentine's Day, they got back so much more. In return they received back grateful expressions of thanks and big smiles, which are apparent in the first photo of four of the wonderful ladies wearing their pins and whose happy faces say it all.


Thanks Suzie and Jane for sharing your story but mostly for sharing your love to 18 seniors you care about. The Wrangell Medical Center must be a wonderful place with happy residents who are fortunate to have such a caring staff. Now you've spread the love and joy to the rest of us. Thanks!


And here's a little extra note from Suzie, "We girls in the kitchen just loved the pins and wish we had ordered ones for ourselves, too!


Ed note: You can see more photos of Valentine brooches and a little about them in the post below this one.